Tuesday, April 26, 2011

Blood Diamonds Artist Statement


This series consists of three wearable pieces that interact with the spaces between the wearer’s toes.  The space between one’s toes is sometimes utilized by slaves working in the river beds sifting for diamonds.  Their only hope for freedom from their oppression is to escape somehow and they will sometimes hide found rough diamonds between their toes in an attempt to thwart the searches made by their captors.  If they are caught trying to smuggle diamonds they are surely put to death, but the diamonds offer their only means of currency during an escape attempt.  Facing fear of death, the slaves attempt to smuggle out these rough diamonds as their only means of freedom.  Each of my pieces utilizes this location as a commentary on the fear and pain of this desperate attempt at freedom.
The first piece depicts a large crystalline growth coming from between the wearer’s toes of their right foot.  It is weighty, uncomfortable, and very evident, as I imagine the slaves experience the tiny smuggled rough diamond between their toes.  This model speaks to the experience of the slave.
The second model mimics the same crystalline growth, but on a much smaller scale.  This piece is sculpted to fit perfectly under the toes of the wearer’s left foot and is completely invisible from the top of the foot.  This piece is secret to the wearer and represents the precious aspect of the diamond and is secret to the wearer.
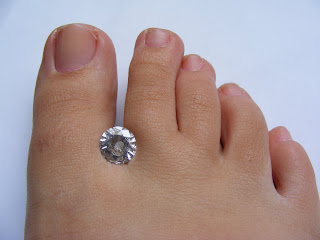
The third piece utilizes form and texture to reference the rivers these stones are found in.  It fits the wearer’s right foot and only the cubic zirconia is visible from the top of the foot.  The CZ is meant to represent the western view of a diamond, pristine and bright.  This is all that the public sees from the top of the foot, but the wearer is aware of the underside and its connection to the origin of the diamond.  This model pairs conflicting imagery and employs such a meaningful location to culminate the series.
Sunday, April 24, 2011

Model 3 Finished


Other blog posts 4

Model 3 Pre-CZ

Model 3: Untitled
(pre-CZ)


Model 2 Finished

Model 2: Hidden Treasures


Model 1 Finished

Model 1: Growth
patina- liver of sulfur, dye oxide


Cleaning Facets

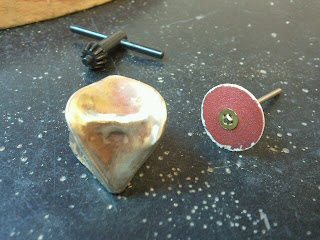
Cleaning up the facets on these pieces was not the easiest.  I found snap-on sanding wheels to be the most effective and controllable.  Here's an image of an unclean piece.

Place Casting

Here's a low-down of my experiences place casting a CZ.

CZ set into wax
CZ stayed in place during burnout
CZ cast well into bronze
CZ shattered during quench
Removed remaining crystals lodged in bronze with burs and chisel
Replaced CZ and epoxied in place

A Perfect Cast

Look at that beautiful button!
 A lovely, successful cast.
I was afraid about the small amount of metal that my calculations called for, but it turned out fine!

Casting!

The investment is in and we cast after the Student Research Expo.  Check out Jess representin'

Blood Diamonds: Model 3 Wax

Here is the last blood diamonds model I made.  I thought I would attempt a place casting as a learning experience.


The texture on the piece is meant to reference the rivers that diamonds are panned for in.  I meant for it to look like water/mud was running between one's toes.

Blood Diamonds: Model 2 Wax

Here's some images of my wax work for my second blood diamonds model.
 Above is the rough out made with the band saw.
 Above is how it looked as I was adding facets.
This was probably the toughest model to make.  I broke it so many times by taking facets too far in.  Infuriating.
It was also really tough to carve it to match my foot.

RTV molding

I finished my first model and set it up to make an RTV mold, but the molding material was locked up.  So I just took it out of the frame and sprued it to my rubber base.

Blood Diamonds: Model 1 Wax

Here are my initial waxes for the first model in my blood diamonds series.  I went in with a file and made the surface completely faceted after this stage.


Sunday, April 10, 2011

Experimental Materials Project Brainstorming

Here are some of my initial sketches for the last project.  The project I am imagining combines cast bronze and silicone.  I'm not sure how I'm going to go about making this yet, but I like where it is going.


Wax Models

Click here to see images of all of my wax models from the skeleton-to-skin project.

Wednesday, April 6, 2011

Monday, April 4, 2011

Finished Pieces

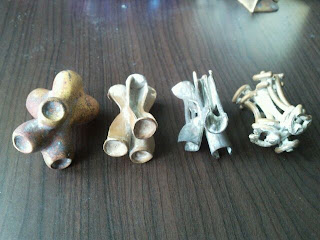
All 8 pieces are done!  It was a long and draining process but they are all finished.

My two favorites...probably because they took the longest.

Patina

I used a liver of sulfur patina to make the two types of bronze go together because the second type I used was very yellow and looked silly with the other pieces.  I then tumbled all of the pieces with steel shot.

Cleaning Cast Pieces

Cleaning the cast pieces took much longer than anticipated.  I used many different methods, trying to use what worked best for each model.  Here are some images from my cleaning up the soldered together piece.  That one took the longest by far.

Cutting Sprues

I primarily used splitting disks to cut my pieces apart and, after some words of wisdom from Rachel, did not end up injuring myself.  It went pretty smoothly.  Splitting disks and mizzy wheels make a kick-ass team.


I ground down the sides of the two-part piece so they fit together nicely before soldering them.

Casting

I got two flasks in the first class casting and my last flask in the second class casting.  It was great timing because I had a lot of extra eyes on my pieces so all but one piece flowed well.  I came in out of class twice to help with other castings and I feel really confident with the process now.  There were definitely some hiccups but it was all a great learning process.